frame
Howdy, Stranger!
It looks like you're new here. If you want to get involved, click one of these buttons!
Sign In RegisterHowdy, Stranger!
It looks like you're new here. If you want to get involved, click one of these buttons!
Quick Links
Categories
- 1.4K All Categories
- 7.3K General
- 6.2K General Discussions
- 412 Feature Request/Bug Report
- 545 Sales Questions and Answers
- 54 Time4VPS Life
- 242 Help requests
- 244 Server management
- 390 Tutorials
- 68 Various Tutorials
- 71 Web hosting control panels
- 133 Performance and Security
- 29 Web Applications
- 64 Linux Applications
- 25 Windows VPS
[DirectAdmin] Let's encrypt certificates installation in your DirectAdmin control panel
 Valentine
Member

In this tutorial you will find out how you can benefit from these certificates by providing security for your "DirectAdmin" websites.
The tutorial was prepared with our "DirectAdmin 1.5 with CentOS 6" template and is meant to work on our self-managed virtual private servers.
0. Preliminary requirements:
"DirectAdmin 1.5 with CentOS 6" template installed on server;
1. Updating "DirectAdmin" control panel:
cd /usr/local/directadminwget --no-check-certificate -O update.tar.gz 'https://www.directadmin.com/cgi-bin/daupdate?redirect=ok&uid=XXXX&lid=YYYYY'Where XXXX - Client ID, YYYYY - License ID in "DirectAdmin" control panel under "Admin Level" > "Licensing / Updates".
tar xvzf update.tar.gz./directadmin pcd scripts./update.shservice directadmin restart2. Enabling "Let's Encrypt":
echo 'letsencrypt=1' >> /usr/local/directadmin/conf/directadmin.confecho 'enable_ssl_sni=1' >> /usr/local/directadmin/conf/directadmin.confcd /usr/local/directadmin/custombuild/./build rewrite_confs3. Installing "Let's encrypt certificate
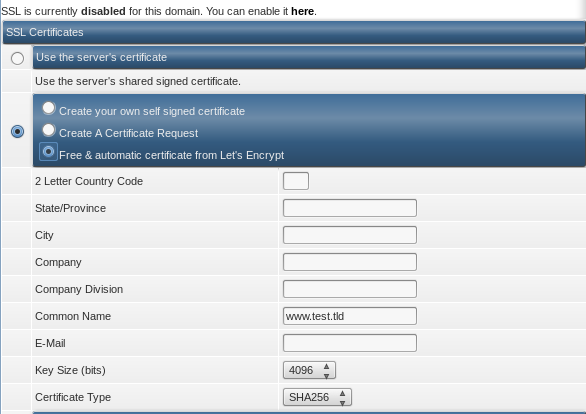
Login to your "DirectAdmin" control panel "user level" and choose a domain. In menu select "SSL Certificates" and after selecting "Free & automatic certificate from Let's Encrypt" and filling up fields:

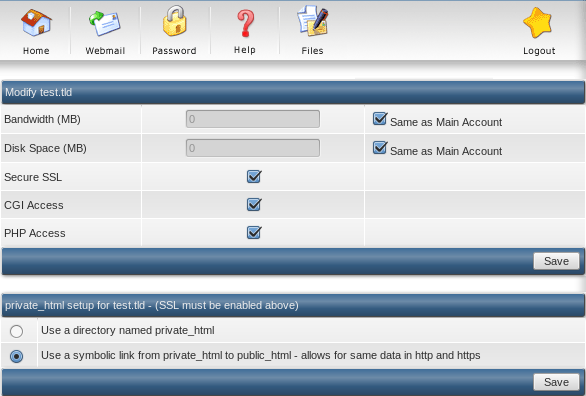
Now what is left is just to enable SSL on you website. For this get back to menu and select "Domain Setup". Select the domain for which you installed certificate and after checking "Secure SSL" box press "Save". If you want for HTTPS protocol to show what is in "public_html" folder check "Use a symbolic link from private_html to public_html - allows for same data in http and https" line and press "Save". The result should look like this:

Tagged:


