
frame
Howdy, Stranger!
It looks like you're new here. If you want to get involved, click one of these buttons!
Sign In RegisterHowdy, Stranger!
It looks like you're new here. If you want to get involved, click one of these buttons!
Quick Links
Categories
- 1.4K All Categories
- 7.3K General
- 6.2K General Discussions
- 412 Feature Request/Bug Report
- 545 Sales Questions and Answers
- 54 Time4VPS Life
- 242 Help requests
- 244 Server management
- 390 Tutorials
- 68 Various Tutorials
- 71 Web hosting control panels
- 133 Performance and Security
- 29 Web Applications
- 64 Linux Applications
- 25 Windows VPS


How To Install Anaconda on AlmaLinux 9 and Rocky Linux 9
 Michail
Moderator
Michail
Moderator
Introduction
Anaconda is a popular data science and machine learning platform. It supports Python and R programming languages. It is used for large-scale data processing, predictive analytics, and scientific computing.
In this guide we will show how to install Anaconda on AlmaLinux 9 and Rocky Linux 9.
Installation Guide
1. Update the system
First, update your package list to ensure all software is up to date:
dnf update -y
2: Download the Latest Anaconda Installer
Use wget to download the latest Anaconda installer from the official website (in our case, the latest version is Anaconda3-2024.10-1):
dnf install wget
wget https://repo.anaconda.com/archive/Anaconda3-2024.10-1-Linux-x86_64.sh
3. Verify the Installer
To make the script executable:
chmod +x Anaconda3-2024.10-1-Linux-x86_64.sh
4. Run the Installer
Start the installer script:
./Anaconda3-2024.10-1-Linux-x86_64.sh
Press Enter to view the license.
Use the Space to scroll through.
Type yes to accept the license.
Then, press Enter to install in the default location (~/anaconda3) or provide a custom path.
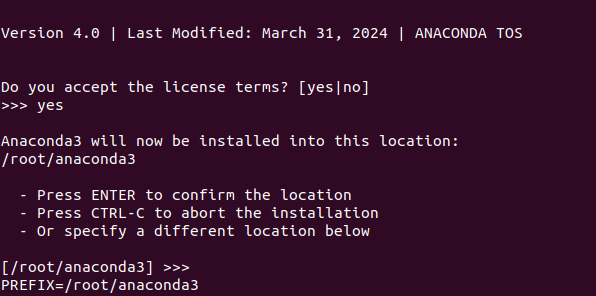
You will also be asked if you wish to update your shell profile to automatically initialize conda. You can just press enter (which means "no" by default") and continue.
5. Activate Conda
After installation completes:
source ~/anaconda3/bin/activate
6. Check Conda Version
Verify that Conda is working:
conda --version
7. Initialize Conda (Add to Shell)
Run this to set up automatic Conda activation in your shell:
conda init
Then reboot your system:
reboot
8. Update Conda
Make sure Conda itself is up to date:
conda update -n base -c defaults conda
9. Create and Activate a New Environment
Create a test environment with Python 3.9:
conda create -n test_env python=3.9
Activate it:
conda activate test_env
Check the Python version:
python --version
Additional
If you're inside an environment like test_env and want to deactivate it:
conda deactivate
This will return you to the base environment.
To exit from the base environment, run the same command again.
You're all set! Now you can install packages, manage environments, and use Conda effectively.
foot
Feel free to join our constantly expanding community, participate in discussions, strengthen your knowledge on Linux and Windows server management!
© 2013 - 2025 Time4VPS. All rights reserved.