
frame
Howdy, Stranger!
It looks like you're new here. If you want to get involved, click one of these buttons!
Sign In RegisterHowdy, Stranger!
It looks like you're new here. If you want to get involved, click one of these buttons!
Quick Links
Categories
- 1.4K All Categories
- 7.3K General
- 6.2K General Discussions
- 412 Feature Request/Bug Report
- 545 Sales Questions and Answers
- 54 Time4VPS Life
- 242 Help requests
- 244 Server management
- 390 Tutorials
- 68 Various Tutorials
- 71 Web hosting control panels
- 133 Performance and Security
- 29 Web Applications
- 64 Linux Applications
- 25 Windows VPS


How to install Virtualmin
 Eugene
Moderator
Eugene
Moderator

Virtualmin is a powerful web hosting control panel built on Webmin, designed for managing multiple domains, websites, databases, email accounts, and server resources. It provides an intuitive GUI-based alternative to cPanel, supporting Apache/Nginx, MySQL/MariaDB, PHP, Postfix, Dovecot, and other essential hosting components. Virtualmin is available in both free (GPL) and premium versions, making it a flexible solution for individuals and businesses.
Important Considerations Before Installation
Before installing Virtualmin, keep these key points in mind:
- Fresh OS Installation Required – Virtualmin is designed for a clean server. Installing it on a pre-configured system may cause conflicts.
- Supported Operating Systems – Compatible with AlmaLinux 9, Debian 12, and Ubuntu 24.04
- System Resources – At least 1GB RAM (2GB+ recommended) and sufficient disk space for hosting websites.
1. Installation
1. Update Your System
Run the following command to update all packages:
AlmaLinux
sudo dnf update -y
Debian / Ubuntu
sudo apt update && sudo apt upgrade -y
2. Download Virtualmin Install Script
Use wget to fetch the install script:
wget https://software.virtualmin.com/gpl/scripts/install.sh
3. Run the Installation Script
Make the script executable and start the installation:
chmod +x install.sh
sudo ./install.sh
- Type 'y' and press Enter to proceed when prompted.
- The script will automatically install Webmin, Virtualmin, Apache/Nginx, MariaDB/MySQL, PHP, Postfix, Dovecot, and other necessary components.
After installation you should see following message:

2. Accessing Virtualmin
5. Access Virtualmin through the browser
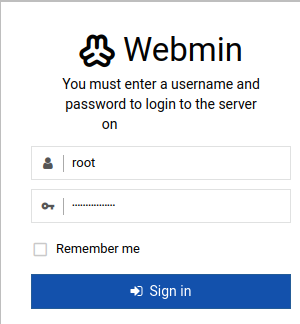
Once the installation is complete, access Virtualmin via your browser:
If you see a security warning, accept the self-signed certificate to proceed.
- Username: root
- Password: Your root password
3. Configuring Virtualmin
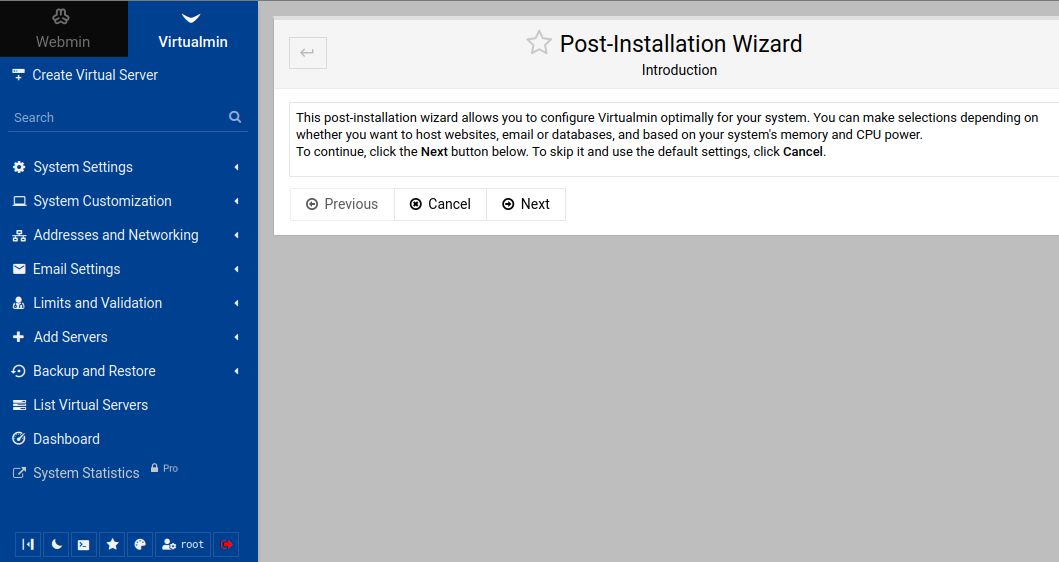
6. Complete Post-Installation Wizard
* Set the database configuration (MySQL/MariaDB).
* Choose PHP versions and memory limits.
* Enable or disable features based on your needs.
4. Secure Virtualmin
7. Install "Let's Encrypt"
If you have a domain pointing to your server, enable SSL:
- Go to Webmin > Webmin Configuration > SSL Encryption.
- Click Let's Encrypt and request an SSL certificate.
8: Configure Firewall
Ensure these ports are open:
sudo firewall-cmd --permanent --add-service=http
sudo firewall-cmd --permanent --add-service=https
sudo firewall-cmd --permanent --add-port=10000/tcp
sudo firewall-cmd --reload
Set Up Automatic Updates (Optional)
Enable automatic security updates:
AlmaLinux
sudo dnf install dnf-automatic -y
sudo systemctl enable --now dnf-automatic
Debian/Ubuntu
sudo apt install unattended-upgrades -y
sudo dpkg-reconfigure unattended-upgrades
Virtualmin is now installed and ready to manage your websites, email, databases, and more.
foot
Feel free to join our constantly expanding community, participate in discussions, strengthen your knowledge on Linux and Windows server management!
© 2013 - 2025 Time4VPS. All rights reserved.