frame
Howdy, Stranger!
It looks like you're new here. If you want to get involved, click one of these buttons!
Sign In RegisterHowdy, Stranger!
It looks like you're new here. If you want to get involved, click one of these buttons!
Quick Links
Categories
- 1.4K All Categories
- 7.3K General
- 6.2K General Discussions
- 412 Feature Request/Bug Report
- 545 Sales Questions and Answers
- 54 Time4VPS Life
- 242 Help requests
- 244 Server management
- 390 Tutorials
- 68 Various Tutorials
- 71 Web hosting control panels
- 133 Performance and Security
- 29 Web Applications
- 64 Linux Applications
- 25 Windows VPS
Samba file server Ubuntu/Debian
Samba is an open-source software suite that enables file and print sharing between systems running Windows, Linux, and macOS over a network. It implements the SMB (Server Message Block) and CIFS (Common Internet File System) protocols, allowing seamless integration with Windows-based networks. Samba provides tools for managing user authentication, file permissions, and resource sharing, making it ideal for both small networks and enterprise environments.
Installation
1. System update
First of all, update your operating system by running this command:
apt update && apt upgrade -y
2. Installing Samba
Run the following command to install Samba:
apt install samba -y
Verify if Samba was installed on the server:
whereis samba
samba -V
If you see the output, Samba application is installed on your server.

Lastly check if it is up and running:
systemctl status smbd

3. Setting up Samba
Once Samba is installed, there are configuration settings that need to be adjusted. Firstly, create a shared folder:
mkdir /home/username/foldername/
Use your username and create a new folder with any name you prefer (the user should already exist).
Secondly, configure Samba configuration file, for this tutorial nano editor will be used:
nano /etc/samba/smb.conf
At the bottom of the file paste in following lines:
[foldername]
comment = Samba on Ubuntu
path = /home/username/foldername
read only = no
browsable = yes
valid users = @username
Correct the lines, so they match with your server. [foldername] use your own created directory name, "comment" - a simple description of the server, "path" - use the path you have created a directory earlier.
Add the user to the Samba service:
smbpasswd -a username
Instead of username use your created user in the system.
Restart Samba service
systemctl restart smbd
Update the Firewall of your server
ufw allow samba
Also if folder was created with the "root" user, but you prefer to log in with any other user, update permissions:
chown username:username -R /home/username/foldername/
Instead of username use your created user in the system.
4. Test the Samba application
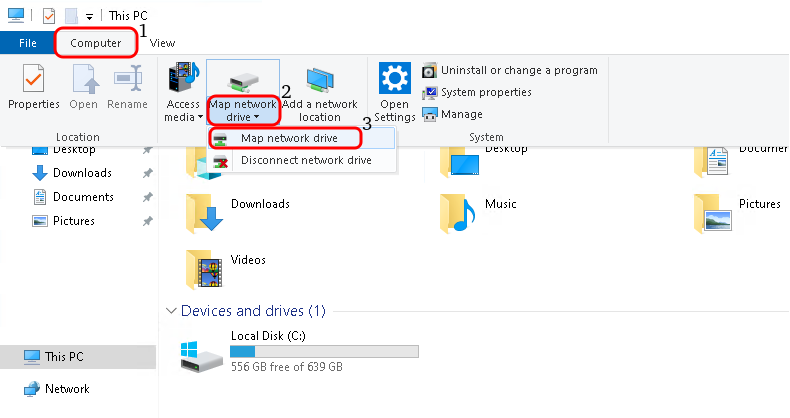
If you are using Windows, navigate to "My Computer" and map the drive.

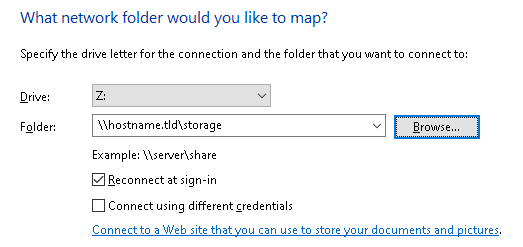
Write in your server's hostname or IP address and specify the path. For example in this tutorial it would be:
\\hostname.tld\storage

When prompted for a login, select "Registered user" and write in the username and password which you created with smbpasswd command.
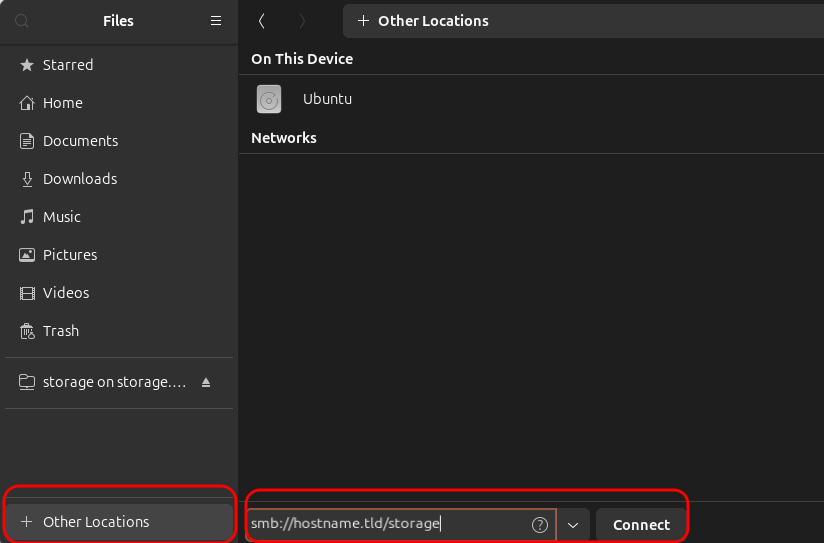
If your are using Linux, access your file manager application and navigate to "Other locations". You need to write in additional characters:
smb://hostname.tld/storage

Conclusion
After completing the installation and configuration, you are ready to use the server for a file sharing inside your file manager's location. The server can be used on multiple devices at once and does not require login everytime, which speeds up the productivity. Samba can be also used on smart phones with IOS and Android operating systems. You can relate on these guides how to connect to the Samba application which is installed on your server:
IOS: https://support.apple.com/en-is/guide/iphone/iphe9aff429a/ios
Android: https://www.wikihow.com/Access-a-Shared-Folder-on-Android


