
frame
Howdy, Stranger!
It looks like you're new here. If you want to get involved, click one of these buttons!
Sign In RegisterHowdy, Stranger!
It looks like you're new here. If you want to get involved, click one of these buttons!
Quick Links
Categories
- 1.4K All Categories
- 7.3K General
- 6.2K General Discussions
- 412 Feature Request/Bug Report
- 545 Sales Questions and Answers
- 54 Time4VPS Life
- 242 Help requests
- 244 Server management
- 390 Tutorials
- 68 Various Tutorials
- 71 Web hosting control panels
- 133 Performance and Security
- 29 Web Applications
- 64 Linux Applications
- 25 Windows VPS


How to Install Apache Web Server on Ubuntu/Debian
 Michail
Moderator
Michail
Moderator
Introduction
Apache is a widely used open-source web server. It supports various modules to extend its functionality: for example, a module for handling dynamic content (e.g. PHP, Python), security and caching.
Apache is characterized by its flexibility and customizability, which allows server administrators to adjust configuration parameters, thereby optimizing performance and security. It also supports virtual hosts, so it can serve multiple sites simultaneously.
In this guide we will install Apache on Ubuntu (starting from 20.04 version) and Debian (starting from 11 version).
Please note. In this tutorial, we use vi as the text editor. However, on Debian, the default vi editor is a minimal version that lacks some advanced features, making it difficult to handle tasks like pasting text from external sources. For a more user-friendly experience, consider using nano.
Installation Guide
1. Update the system
First of all, make sure to update your system:
apt update && apt upgrade -y
2. Install Apache
Once system is updated, run this command to install Apache:
apt install apache2 -y
3. Start Apache
To start Apache, run the following command:
systemctl start apache2
To start Apache automatically at every boot, run this command:
systemctl enable apache2
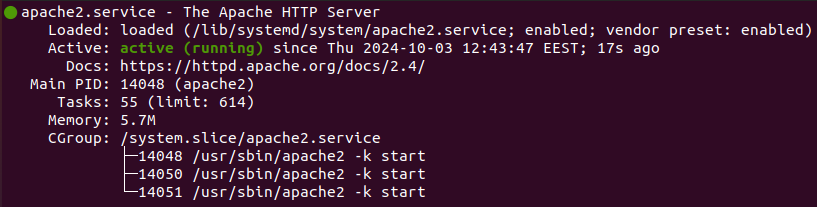
Now you can check Apache status (it should be active):
systemctl status apache2
4. Open port 80 and 443
For HTTP and HTTPS, you need to open ports 80 and 443 in your firewall. You can do this in IPtables or UFW:
IPtables:
If you use IPtables, run these commands:
iptables -I INPUT -p tcp --dport 80 -j ACCEPT
iptables -I INPUT -p tcp --dport 443 -j ACCEPT
To save the changes you need to install iptables-persistent (if you haven't already):
apt install iptables-persistent
Then run this command:
iptables-save | tee /etc/iptables/rules.v4
UFW:
If you use UFW (Uncomplicated Firewall), run this command:
ufw allow 'Apache Full'
Then reload the UFW:
ufw reload
5. Create a new Virtual Host
Create a new configuration file for the virtual host (type your actual domain instead of your_domain.ltd):
vi /etc/apache2/sites-available/your_domain.ltd.conf
Then, paste the following content inside, updating your_domain.ltd and admin@your_domain.ltd with your actual domain and email address):
  <VirtualHost *:80>
   ServerAdmin admin@your_domain.ltd
   ServerName your_domain.ltd

   DocumentRoot /var/www/html/your_domain.ltd
   DirectoryIndex index.html index.php

   ErrorLog ${APACHE_LOG_DIR}/error.log
   CustomLog ${APACHE_LOG_DIR}/access.log combined

   <Directory /var/www/html/>
   Options Indexes FollowSymLinks
   AllowOverride All
   Require all granted
   </Directory>
   </VirtualHost>
Disable the default Apache virtual host:
a2dissite 000-default
Activate the new Apache virtual host configuration (change your_domain.ltd to your actual domain):
a2ensite your_domain.ltd
Reload Apache:
systemctl reload apache2
6. Create Test Page
Create the web root directory (change your_domain.ltd to your actual domain):
mkdir -p /var/www/html/your_domain.ltd
Create a new index.html file in this directory:
vi /var/www/html/your_domain.ltd/index.html
Inside, paste this content:
  <html>
   Page for testing purposes
  </html>
Save the file and exit (press "Esc", then type :wq and click "Enter").
Assign ownership privileges of the web root directory to the web server user and group www-data:
chown -R www-data:www-data /var/www/html/your_domain.ltd
Restart Apache for changes to take effect:
systemctl restart apache2
To establish a secure connection, follow the steps below.
7. Set Up the SSL Certificate
First, install certbot:
apt install certbot python3-certbot-apache
Aftet this, you can enable a new SSL certificate for your domain. Enter this command and change your_domain.ltd to your actual domain and admin@your_domain.ltd to your email address:
certbot --apache --agree-tos --redirect -d your_domain.ltd -m admin@your_domain.ltd
When issuing a certificate, you will need to agree or disagree to share your email address with Electronic Frontier Foundation (optional).
Restart Apache:
systemctl restart apache2
Then, you can check if SSL was enabled successfully. Navigate to the web browser, go to the created test page, and check if it opens with a valid Let's EncryptSSL certificate (via HTTPS). Click on the padlock icon in the address bar to see information about the certificate.
8. Manual and automatic SSL renewal
Certificate will be valid for 90 days. You can renew them manually or automatically.
For manual renewal, run this command:
certbot renew
This command checks if the certificate is within 30 days of expiration and, if so, renews it.
Also, certbot usually sets up a cron job located in /etc/cron.d/. You can check if it exists:
cat /etc/cron.d/certbot
This task is typically scheduled to run twice a day, ensuring that renewals are performed on time. This is done automatically, so your certificates stay updated without user intervention.
You're all set! When needed, Certbot will renew your certificates and reload Apache to apply the updates.
foot
Feel free to join our constantly expanding community, participate in discussions, strengthen your knowledge on Linux and Windows server management!
© 2013 - 2025 Time4VPS. All rights reserved.