
frame
Howdy, Stranger!
It looks like you're new here. If you want to get involved, click one of these buttons!
Sign In RegisterHowdy, Stranger!
It looks like you're new here. If you want to get involved, click one of these buttons!
Quick Links
Categories
- 1.4K All Categories
- 7.3K General
- 6.2K General Discussions
- 412 Feature Request/Bug Report
- 545 Sales Questions and Answers
- 54 Time4VPS Life
- 242 Help requests
- 244 Server management
- 390 Tutorials
- 68 Various Tutorials
- 71 Web hosting control panels
- 133 Performance and Security
- 29 Web Applications
- 64 Linux Applications
- 25 Windows VPS


How To Install Webmin on Ubuntu/Debian
 Michail
Moderator
Michail
Moderator

Introduction
Webmin is a web interface that allows you to configure servers through a graphical interface. All you need is a browser to access the host.
With Webmin you can:
- manage user accounts;
- update and configure the system;
- install, update, and remove software packages;
- view system logs and emails;
- configure the firewall;
- adjust disk quotas to control the space that other users use;
- create virtual hosts.
In this guide we will install latest Webmin version on Ubuntu (starting from 20.04 version) and Debian (starting from 11 version).
Prerequisites
During installation, you will need some additional tools and adjust firewall settings. In this case you will need vi (text editor) and UFW (Uncomplicated Firewall). Usually they are installed by default, but if necessary, you can install them manually.
To install ufw, run this command:
apt install ufw
Then enable it:
ufw enable
If you just installed UFW, port 22 (SSH) will not be allowed by default. To allow it, enter this command:
ufw allow 22
To install vi run the following command:
apt install vim
Please note. In this tutorial, we use vi as the text editor. However, on Debian, the default vi editor is a minimal version that lacks some advanced features, making it difficult to handle tasks like pasting text from external sources. For a more user-friendly experience, consider using nano.
Installation Guide
1. Update the system
First, you need to update your system. Run the following command:
apt update
apt upgrade
2. Download Webmin repository script.
To download Webmin repository script run this command:
curl -o setup-repos.sh https://raw.githubusercontent.com/webmin/webmin/master/setup-repos.sh; bash setup-repos.sh
Agree to the changes by typing y.
Then run the script:
bash setup-repos.sh
3. Install Webmin
Now you can install Webmin:
apt install --install-recommends webmin -y
After installation, you can check the status of Webmin:
systemctl status webmin
If everything is correct and Webmin is running, you should see the following:

At this point, Webmin should already be accessible via your web browser. You can check this by entering your server's hostname and port 10000:
However, the connection will not be secured by default. If you want to access Webmin via https, follow the steps below.
4. Secure Webmin with Let's Encrypt
First, we need to enable port 80 (HTTP) to run Let's encrypt:
ufw allow 80/tcp
Then, install certbot:
apt install certbot -y
Now you can generate SSL. It can be generated for your default VPS hostname or the domain that is pointed to the server. Run the following command (change your_domain to your actual domain and write your email instead of [email protected]):
certbot certonly --standalone -d your_domain -m [email protected] --agree-tos
The output will indicate where the certificate and key are stored.
Successfully received certificate.
Certificate is saved at: /etc/letsencrypt/live/your_domain/fullchain.pem
Key is saved at: /etc/letsencrypt/live/your_domain/privkey.pem
Use these paths to merge the certificate and key into .pem file (in our example webmin.pem):
cat /etc/letsencrypt/live/your_domain/fullchain.pem /etc/letsencrypt/live/your_domain/privkey.pem > webmin.pem
Next, move this file to the Webmin directory:
mv webmin.pem /etc/webmin/
Open Webmin configuration file:
vi /etc/webmin/miniserv.conf
Inside the file, find "keyfile" and replace its value with the path to the webmin.pem:
keyfile=/etc/webmin/webmin.pem
Save the file and exit (press "Esc", then type :wq and click "Enter").
Restart the Webmin:
systemctl restart webmin
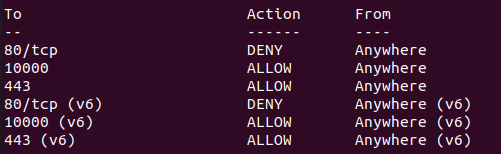
5. Adjust Firewall Rules
Now you need to set up some firewall rules. First, allow Webmin port, which is port 10000:
ufw allow 10000
Then allow https for secure connection:
ufw allow https
Deny http connection:
ufw deny http
Next, check all firewall rules with the following command:
ufw status
It should look something like this:
6. Test Webmin
Now you can try to access Webmin through HTTPS via your web browser:
https://your_hostname:10000
You should see the login page:
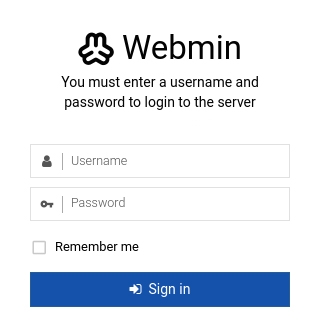
You can enter the credentials of your root user or any other user created on your server.
Once connected, you can start using Webmin:
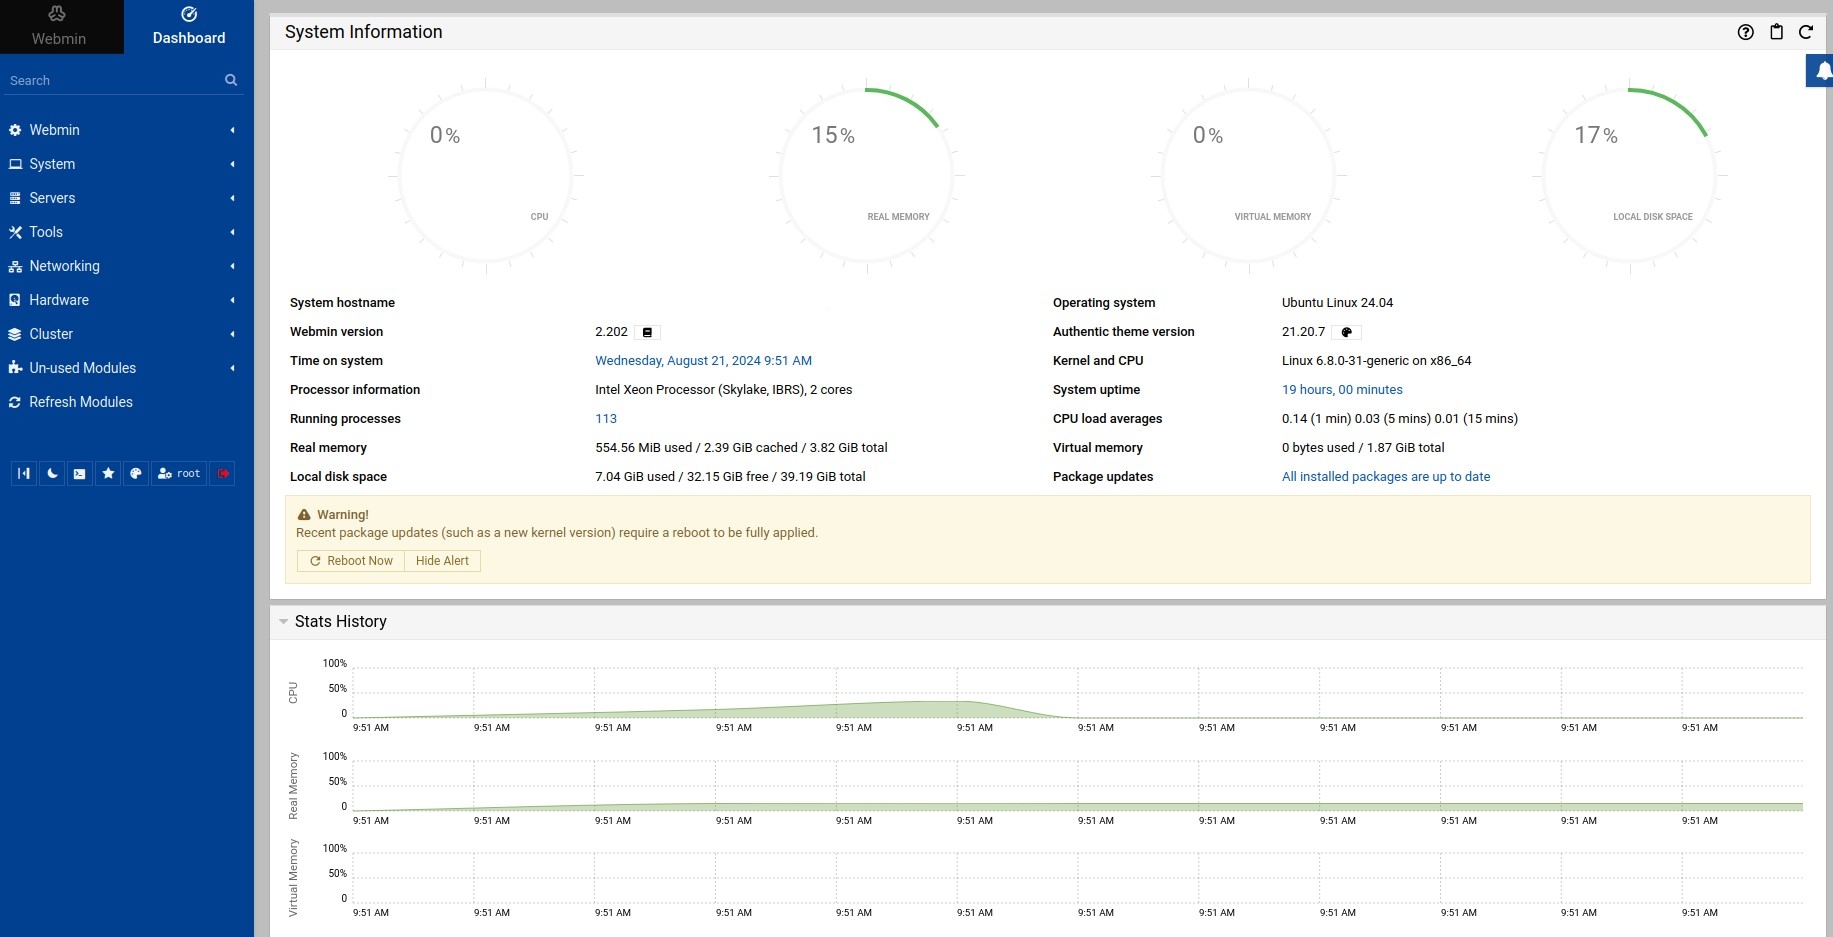
Now, you can manage your server via Webmin!
foot
Feel free to join our constantly expanding community, participate in discussions, strengthen your knowledge on Linux and Windows server management!
© 2013 - 2025 Time4VPS. All rights reserved.
Comments
Can I do the same at Mac? I am using it. Kindly do lemme know.
Webmin is primarily designed for Linux and Unix-based servers. While macOS is a Unix-based system, Webmin does not officially support macOS. Webmin is supported only on Ubuntu, Debian, AlmaLinux, and Rocky Linux. For more details, refer to the official Virtualmin documentation.
Thank you.. I was looking for it!
Thank you so much for detailed post. I was looking for it and finally got from here. Keep sharing such amazing content with community.
Excellent work.Keep it up.
Thanks man! I always faced same but now I got the answers.
Gracias por una publicación tan informada. Sin embargo, no funciona en mi Macbook.
Webmin does not support macOS. It can be run only on Ubuntu, Debian, AlmaLinux, and Rocky Linux.
I'm trying to follow the steps to install Webmin on my Ubuntu server from this post (https://community.time4vps.com/discussion/740/how-to-install-webmin-on-ubuntu-debian), but I'm getting a "package not found" error. Not sure what I'm missing any help would be appreciated!
Hello,
the "package not found" error usually means the Webmin repository isn’t properly added or updated. Please make sure you’ve run all the steps in the guide exactly, including updating package lists (apt update). If the problem continues, could you share the exact commands you ran and the error output and also clarify your Ubuntu version?
Hello dear, this guide worked for me greatly, (https://community.time4vps.com/discussion/740/how-to-install-webmin-on-ubuntu-debian)
thanks good information.
Great! Finally founded a solution and it’s working. Thank you.
Great to hear it worked for you! If you run into any other issues or have tips of your own, feel free to share.
I was also facing this issue. I logged in to my account, searched the community, and found this post. I read it carefully, and it cleared up all my issues. Thanks, Michal!
This is so great thanks man it will finally fixed my issue. Big thanks to Michail.
Great step-by-step tutorial! I appreciate how clearly it covers everything—from updating the system and setting up the Webmin repository with the script, to securing access using Let’s Encrypt and adjusting UFW firewall rules. Super helpful for anyone wanting an easy, secure install of Webmin on Ubuntu or Debian. Thanks for breaking it down so well!
Thanks for the guide! Quick question can I use nano instead of vi during the installation, and will that cause any issues with configuring Webmin?
Yes, using nano is totally fine - it’s just an editor preference and won’t cause any problems with Webmin’s setup or configuration. You can use any text editor that you like.
Thanks, I try this.