
frame
Howdy, Stranger!
It looks like you're new here. If you want to get involved, click one of these buttons!
Sign In RegisterHowdy, Stranger!
It looks like you're new here. If you want to get involved, click one of these buttons!
Quick Links
Categories
- 1.4K All Categories
- 7.3K General
- 6.2K General Discussions
- 412 Feature Request/Bug Report
- 545 Sales Questions and Answers
- 54 Time4VPS Life
- 242 Help requests
- 244 Server management
- 390 Tutorials
- 68 Various Tutorials
- 71 Web hosting control panels
- 133 Performance and Security
- 29 Web Applications
- 64 Linux Applications
- 25 Windows VPS


How to install XRDP on CentOS 7 / AlmaLinux 8 / AlmaLinux 9
 Michail
Moderator
Michail
Moderator
Introduction
Xrdp is a free application that allows you to connect to a Linux server from Windows machines over RDP protocol.
In this guide, you will learn how to enable xrdp on RedHat based distributions (CentOS 7, AlmaLinux 8 and 9 versions).
WARNING
CentOS 7 reached the EOL June 30, 2024:
https://blog.centos.org/2023/04/end-dates-are-coming-for-centos-stream-8-and-centos-linux-7/
Because of this, you may encounter some repository issues. We recommend that you reinstall another OS that has not yet reached EOL.
If you are using CentOS 7 and encounter a mirror issue, please check out this guide to resolve the problem.
Import GPG key repository (on AlmaLinux 8 only)
This step is for AlmaLinux 8 only. Skip this step if you are installing xrdp on CentOS 7 and AlmaLinux 9.
Run the following command to install GPG key repository on AlmaLinux 8:
rpm --import https://repo.almalinux.org/almalinux/RPM-GPG-KEY-AlmaLinux
Installation Guide
1. Updating the packages
Before installing the xrdp, make sure your software is updated:
yum update
2. Installing the EPEL Repository
The EPEL repository allows you to install frequently used software. To enable it, run the following command:
yum install epel-release
3. Install Xrdp
To install xrdp, run the following command:
yum -y install xrdp tigervnc-server
4. Enable Xrdp
To enable xrdp, run this command:
systemctl enable xrdp
This command enables xrdp automatically every time the server starts.
After you enabled xrdp, make sure to restart it:
systemctl restart xrdp
5. Install GUI
The graphical interface required to log in to the server when you connect over the xrdp. In this example, we will install Xfce.
To install Xfce, run this command:
yum groups -y install "Xfce"
The installation will take some time.
On CentOS 7 and AlmaLinux 9, you will also need to create the Xclients file, which is required to start the desktop environment (you can skip steps for the Xclients file on AlmaLinux 8):
vi ~/.Xclients
Then copy and paste the following content into that file:
 #!/bin/bash
 XFCE="$(which xfce4-session 2>/dev/null)"
 exec "$XFCE"
Save the file and exit (press "Esc", then type :wq and click "Enter").
Now you need to make the file executable:
chmod +x .Xclients
Finally, restart the xrdp to enable changes:
service xrdp restart
6. Enable RDP port
Now you need to open port 3389 (the default RDP port) in the firewall tool that you use.
To enable RDP port in iptables, run the following command:
iptables -I INPUT -p tcp -m tcp --dport 3389 -j ACCEPT
After that save the changes. On CentOS 7 run this command:
service iptables save
On AlmaLinux 8 run the following command:
iptables-save
If you use firewalld, to open port 3389 use this command:
firewall-cmd --add-port=3389/tcp --permanent
After that, reload the firewall:
firewall-cmd --reload
7. Check Xrdp
To make sure the Xrdp is enabled, you can check the status of the service:
systemctl status xrdp.service
Log-in from Windows computer:
To test xrdp, try connecting to your VPS from a Windows computer using the Remote Desktop application. Open the app and enter the following details:
Computer: Your_server_IP
Username: root
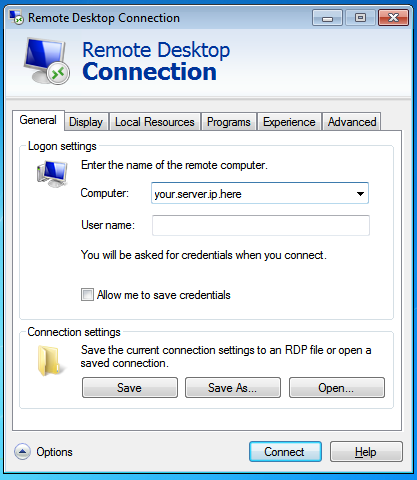
Then click "Connect" and you will see the default xrdp login page, where you need to enter password of your server:
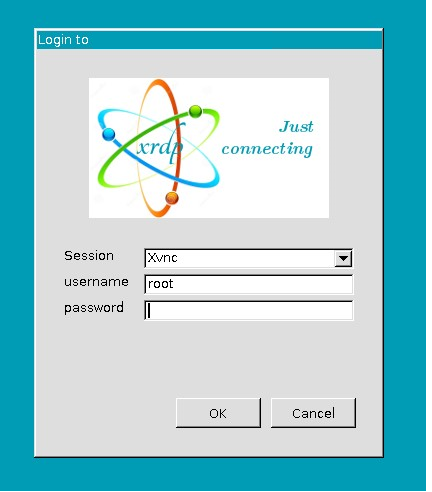
If the credentials are correct, you will access the server with GUI. In CentOS 7, the first time you connect, you will be prompted to select setup. We recommend that you select the default configuration.
Log-in from Linux:
To connect from Linux, you can use RDP tools like "rdesktop":
rdesktop -u root -p PASSWORD -g 1024x768 YOUR_SERVER_IP
Change the "PASSWORD" and "YOUR_SERVER_IP" to ones that match your server.
You can always change the resolution by updating the "-g 1024x768" parameter.
Please note: the first time you connect, the desktop environment will take a little longer to load than usual. This is normal behavior.
foot
Feel free to join our constantly expanding community, participate in discussions, strengthen your knowledge on Linux and Windows server management!
© 2013 - 2025 Time4VPS. All rights reserved.