
frame
Howdy, Stranger!
It looks like you're new here. If you want to get involved, click one of these buttons!
Sign In RegisterHowdy, Stranger!
It looks like you're new here. If you want to get involved, click one of these buttons!
Quick Links
Categories
- 1.4K All Categories
- 7.3K General
- 6.2K General Discussions
- 412 Feature Request/Bug Report
- 545 Sales Questions and Answers
- 54 Time4VPS Life
- 242 Help requests
- 244 Server management
- 390 Tutorials
- 68 Various Tutorials
- 71 Web hosting control panels
- 133 Performance and Security
- 29 Web Applications
- 64 Linux Applications
- 25 Windows VPS


[CentOS 7/AlmaLinux 8/ AlmaLinux9] Let's Encrypt for Apache
 Michail
Moderator
Michail
Moderator
Let's Encrypt is a certificate authority that provides free certificates in a fully automated process.
In this guide, you will learn how to set up a TLS/SSL certificate from Let’s Encrypt on a Centos 7 / AlmaLinux 8 / AlmaLinux 9 server running Apache as a web server.
WARNING
CentOS 7 reached the EOL June 30, 2024:
https://blog.centos.org/2023/04/end-dates-are-coming-for-centos-stream-8-and-centos-linux-7/
Because of this, you may encounter some repository issues. We recommend that you reinstall another OS that has not yet reached EOL.
If you are using CentOS 7 and encounter a mirror issue, please check out this guide to resolve the problem.
Preparation
Before enabling the Let's Encrypt certificate, make sure you have Apache Web Server installed on your server. If not, you can check out our Apache web server installation guide.
You also need to create a virtual host configuration file by typing this command (if you didn't do it during Apache installation):
vi /etc/httpd/conf.d/yourdomain.ltd.conf
Add these lines to the configuration file:
<VirtualHost *:80>
  ServerAdmin [email protected]
  DocumentRoot "/var/www/html"
  DirectoryIndex index.html
  ServerName yourdomain.ltd
  ErrorLog "/var/log/httpd/yourdomain.ltd.error_log"
  CustomLog "/var/log/httpd/yourdomain.ltd.access_log" common
</VirtualHost>
Please note. Make sure to change the "yourdomain.ltd" to your actual domain.
After editing, you can save changes and exit.
1. Creating an index.html file for testing
To create an index.html file for testing, run this command:
vi /var/www/html/index.html
Enter the text for testing in the file:
  <html>
   Page for testing purposes
  </html>
After that, you can save the file and exit.
Now you need to change the owner of the ‘/var/www/html/index.html’ file to Apache by entering this command:
chown -R apache:apache /var/www/html/index.html
This means that Apache can now read this file.
2. Install Certbot
On Centos 7 follow these steps to install Cerbot:
- We need to add the EPEL repository before installing Certbot. Run this command:
yum install epel-release - Install the Certbot:
yum install certbot python2-certbot-apache mod_ssl
On AlmaLinux 8 and 9 follow these steps to install Cerbot:
- Run this command to add the EPEL repository before installing Certbot:
dnf install epel-release - Install the Certbot:
dnf install certbot python3-certbot-apache
3.Set Up the SSL Certificate
To set up the SSL for domain, run this command:
certbot --apache -d yourdomain.ltd
You can install certificate for multiple domains and subdomains by following this command:
certbot --apache -d yourdomain.ltd -d www.yourdomain.ltd -d yourdomain2.ltd -d subdomain.yourdomain2.ltd
When issuing a certificate, you will need to provide an email, that you specified previously in virtual host configuration file ([email protected]).
You will also need to agree to the Terms of Service (mandatory) and agree or disagree to share your email address with Electronic Frontier Foundation (optional)
Please note.
When issuing a certificate, you may receive the following error message:

Cancel the certificate issue process (enter 'c') and restart Apache service with the following command:
systemctl restart httpd
After that, try to issue the certificate again.
4.Check SSL Certificate
Enter this command to check if SSL issued successfully:
ls /etc/letsencrypt/live/yourdomain.ltd/
You should see the following output:
cert.pem chain.pem fullchain.pem privkey.pem
You can also check SSL in your browser. Open your website and click on the padlock icon in the address bar to see information about certificate.
5.Manual and automatic renewal
Let’s Encrypt certificates are valid for 90 days.
You can manually renew certificate with this command:
certbot renew
If the certificate is less than 30 days away from expiration, this command will renew it.
If you want to specify auto-renewal, you can edit the crontab and create cronjob to run the above command twice a day automatically:
crontab -e
Add this line to the crontab:
* */12 * * * root /usr/bin/certbot renew >/dev/null 2>&1
You're all set. When necessary, certbot will renew your certificates and reload Apache to pick up the changes.
Please note.
If, after activating the certificate, your site is still not available and you receive "Secure Connection Failed" error, make sure to allow traffic via HTTPS (port 443), which could be blocked in firewalld by default.
You can check if HTTPS enabled, using this command:
firewall-cmd --list-all
The output will provide you information about enabled services. In this screenshot, you can see that port 443 is enabled:
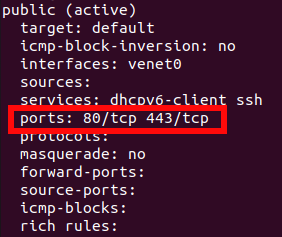
If 443 port disabled, you can enable it with firewalld or iptables.
To enable https service in firewalld, use this command:
firewall-cmd --permanent --add-service=https
Then reload the firewall:
firewall-cmd --reload
To enable https in iptables, use this command:
iptables -I INPUT -p tcp -m tcp --dport 443 -j ACCEPT
Then save the changes:
iptables-save
foot
Feel free to join our constantly expanding community, participate in discussions, strengthen your knowledge on Linux and Windows server management!
© 2013 - 2025 Time4VPS. All rights reserved.