
frame
Howdy, Stranger!
It looks like you're new here. If you want to get involved, click one of these buttons!
Sign In RegisterHowdy, Stranger!
It looks like you're new here. If you want to get involved, click one of these buttons!
Quick Links
Categories
- 1.4K All Categories
- 7.3K General
- 6.2K General Discussions
- 412 Feature Request/Bug Report
- 545 Sales Questions and Answers
- 54 Time4VPS Life
- 242 Help requests
- 244 Server management
- 390 Tutorials
- 68 Various Tutorials
- 71 Web hosting control panels
- 133 Performance and Security
- 29 Web Applications
- 64 Linux Applications
- 25 Windows VPS


[Ubuntu] Let's Encrypt for Nginx
 Justina
Moderator
Justina
Moderator
Let's Encrypt is a free, automated, and open certificate authority (CA) that helps to install free certificates to enable encrypted HTTPS (SSL/TLS) connections for websites. It provides a specialized software called Certbot that automates the installation process. Certbot is also supported on Nginx, and in this tutorial, you will learn how to install and configure automatic renewal for your Let's Encrypt certificate.
It is recommended to create a new Nginx server block file for each domain and avoid using the default file, which often results in common mistakes. You will also maintain the default files as a fallback configuration.
Installation
As always, you need to first check and update local packages on your server:
sudo apt update
sudo apt upgrade
The next step is to install Certbot:
sudo apt install certbot python3-certbot-nginx
Nginx’s Configuration Verification
Cerbot checks server_name directive that matches the domain you request the certificate for. That directive is created when you configure server blocks on Nginx.
You can check the configuration file for the domain using the following command:
sudo nano /etc/nginx/sites-available/example.com
The line to check for is server_name. Configuration should look something like this:
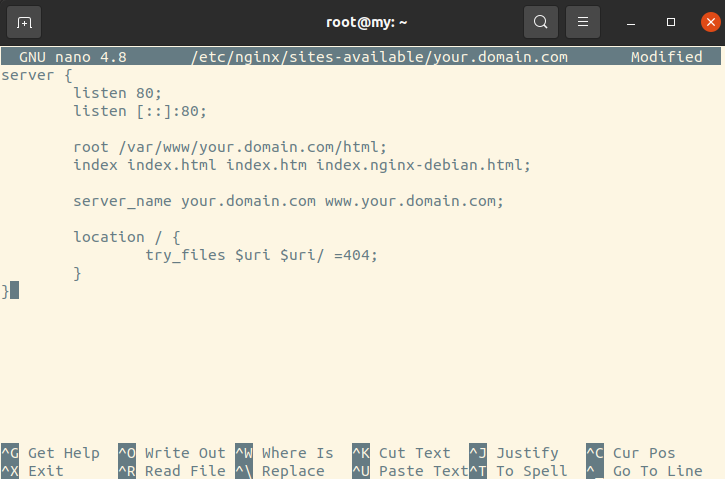
If all is well, move on to the next step.
If the line is missing, you need to fix the file by entering the missing value and verifying if the syntax is correct. For that, you can use the following command:
sudo nginx -t
This command tests your Nginx server's configuration file before restarting or reloading it completely.
If no errors are displayed run the following command to reload Nginx to load the new configuration:
sudo systemctl reload nginx
If errors are found, check your server blocks configuration.
Adjusting Firewall
Nginx registers itself as a service with ufw. Its configuration needs to be adjusted for secure HTTPS connections to be allowed.
To see current status, run command:
sudo ufw status
To add certain traffic, like HTTPS, use allow:
sudo ufw allow 'Nginx Full'
To deny certain traffic, like HTTP, use deny:
sudo ufw deny 'Nginx Full'
To delete a certain profile used, run like HTTP, use delete:
sudo ufw delete allow 'OpenSSH'
Let’s Encrypt Installation
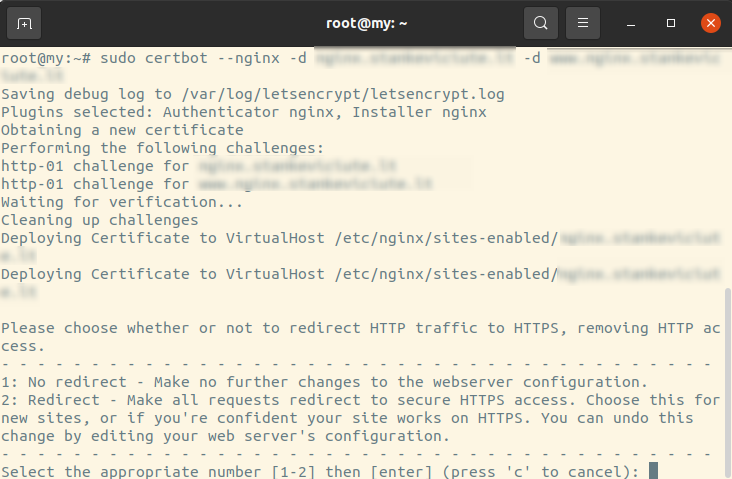
SSL installation takes place through the Certbot plugin for Nginx. Type in the following command by indicating your domain and its www subdomain:
sudo certbot --nginx -d domain.com -d www.domain.com
IMPORTANT For Let’s Encrypt SSL to be issued, not only your domain but its www subdomain needs to be pointed to your server's IP address.
The first time you will use Certbot to obtain SSL for your domain, it will ask you to indicate your email address. It’s used in cases when SSL renewal fails by sending you the warning and additional information.
Next, Certbot will ask whether you want to redirect your traffic to HTTPS. Select the wanted option by clicking 1 or 2:
After this action, Certbot notifies you about successful installation with the following output:
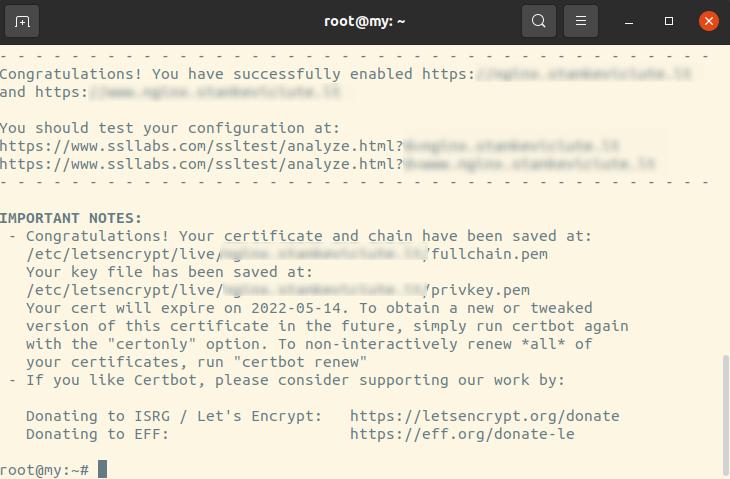
To every that SSL has been installed, visit your site via the browser using HTTPS protocol. You can also check this using third-party tools, such as SSL Shopper.
SSL auto-renewal verification
Let’s Encrypt SSL is valid for 90 days. After this period, SSL needs to be renewed. Certbot automates this process by adding systemd times that run twice a day and automatically renews any SSL that’s within 30 days of expiration.
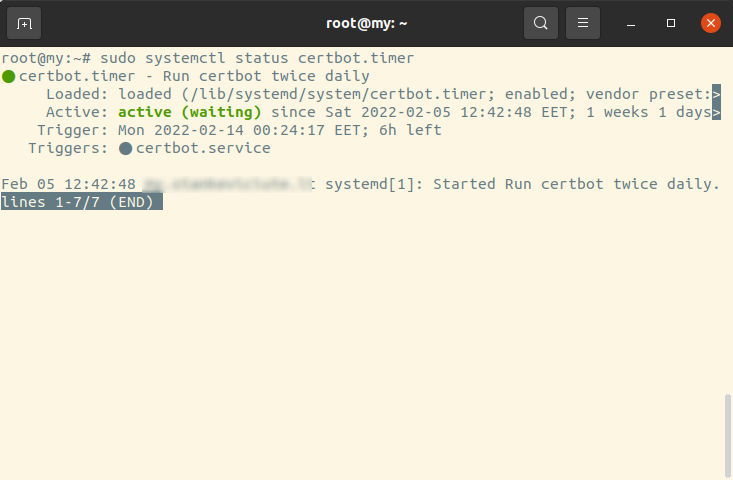
To check the status of the timer with systemctl, run:
sudo systemctl status certbot.timer
This is what your output should look like:
To test the SSL renewal process before expiration, you can run a test using the following Certbot command:
sudo certbot renew --dry-run
If you will not receive any errors, then you are all set. In case something fails during the renewal, Certbox will notify you by the email you have indicated during the SSL installation.
foot
Feel free to join our constantly expanding community, participate in discussions, strengthen your knowledge on Linux and Windows server management!
© 2013 - 2025 Time4VPS. All rights reserved.