frame
Howdy, Stranger!
It looks like you're new here. If you want to get involved, click one of these buttons!
Sign In RegisterHowdy, Stranger!
It looks like you're new here. If you want to get involved, click one of these buttons!
Quick Links
Categories
- 1.4K All Categories
- 7.3K General
- 6.2K General Discussions
- 412 Feature Request/Bug Report
- 545 Sales Questions and Answers
- 54 Time4VPS Life
- 242 Help requests
- 244 Server management
- 390 Tutorials
- 68 Various Tutorials
- 71 Web hosting control panels
- 133 Performance and Security
- 29 Web Applications
- 64 Linux Applications
- 25 Windows VPS
[For Beginers] Transfering Files via FileZilla
 Lawrence
Member

Introduction
FileZilla is a free software, cross-platform FTP application, consisting of FileZilla Client. The client supports FTP, SFTP and FTPS (FTP over SSL/TLS). This tool allows you to securely transfer files to and from your VPS using an encrypted channel, avoiding the security problems and usability issues inherent in traditional FTP client/server systems. FileZilla can send both your login credentials and file transfers over the network securely encrypted (provided you’re using SFTP), while standard FTP clients send this information as plaintext.
Downloading and Installing FileZilla on the Computer
Windows and OS X users can download FileZilla here.
Linux users can run the following commands to install FileZilla.
Debian/Ubuntu:
apt-get install filezillaCentOS/Fedora:
yum install filezilla
Using FileZilla
- Open FileZilla from your Windows start menu, OS X Launchpad, or the launcher provided by your Linux distribution of choice.
- Enter:
| Host: | IP address or hostname of your VPS. |
| Username: | User you want to connect to, for example 'root'. |
| Password: | Password of user you are connecting to. |
| Port: | 22 - if you want to connect via SFTP (recommended) or 21 - if you want to connect via FTP. |

- Click “Quickconnect” to initiate the file transfer session.
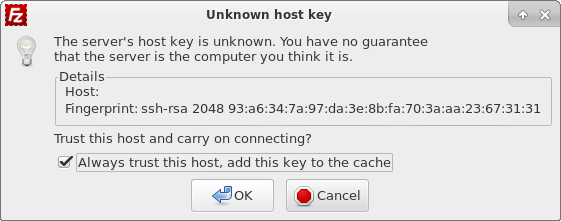
- If this is the first time you’ve connected to your VPS with an SSH or SFTP program, you’ll receive a warning that the host key is unknown. Place a check mark in the box next to “Always trust this host, add this key to the cache.” and pres OK.

- A split view will be presented, with your local filesystem on the left and your VPS filesystem on the right. You may transfer files by dragging and dropping them between each side.
Conclusion
In this tutorial you learned how to transfer files between your computer and your VPS in one of the easiest ways. Some links for additional information regarding this topic:
FileZilla Documentation
FileZilla SSH Key Documentation


