frame
Howdy, Stranger!
It looks like you're new here. If you want to get involved, click one of these buttons!
Sign In RegisterHowdy, Stranger!
It looks like you're new here. If you want to get involved, click one of these buttons!
Quick Links
Categories
- 1.4K All Categories
- 7.3K General
- 6.2K General Discussions
- 412 Feature Request/Bug Report
- 545 Sales Questions and Answers
- 54 Time4VPS Life
- 242 Help requests
- 244 Server management
- 390 Tutorials
- 68 Various Tutorials
- 71 Web hosting control panels
- 133 Performance and Security
- 29 Web Applications
- 64 Linux Applications
- 25 Windows VPS
Installing a TeamSpeak Server
 Lawrence
Member

Introduction
TeamSpeak offers the ideal tool for online gaming, education and training, internal business communication, and staying in touch with friends and family. Our primary focus is delivering a solution that is easy to use, with high security standards, excellent voice quality, and low system and bandwidth usage. Featuring a client-server architecture, TeamSpeak is literally capable of handling up to thousands of simultaneous users.
The TeamSpeak Client and Server provide unmatched functionality for both beginners and advanced users. Packed with powerful features and incredible performance, TeamSpeak is your Swiss Army Knife of voice communication.
Requirements
In this tutorial we will be using Ubuntu 16.04, however you should be able to use all our offered Ubuntu and Debian versions.
In Time4VPS you are able to install Ubuntu 16.04 template really easy and fast, only with few mouse clicks:
- Login to the Client Area;
- Select at the top of menu the "My Services > VPS" tab;
- Press the "Manage" button at the service table;
- Press the "Install OS" button;
- Choose Ubuntu 16.04 operating system, agree with warning and press "Continue";
- Wait for 5-10 minutes and refresh VPS management page.
Updating System
First things first. Like always, first of all, we recommend to update and upgrade your server.
apt-get update
apt-get upgrade -y
Installing TeamSpeak
First of all, create a separate user for security reasons:
adduser teamspeak
passwd -l teamspeakcd /home/teamspeak
Download the TeamSpeak package:
wget http://dl.4players.de/ts/releases/3.12.1/teamspeak3-server_linux_amd64-3.12.1.tar.bz2Extract the package with tar:
tar -xvf teamspeak3-server_linux_amd64-3.12.1.tar.bz2
Running TeamSpeak
Once TeamSpeak is downloaded it's ready to be started as it comes precompiled so no configuration or building is needed. Change to the directory:
cd teamspeak3-server_linux_amd64
Accept with the TeamSpeak license:
touch .ts3server_license_accepted
Run the startup script:
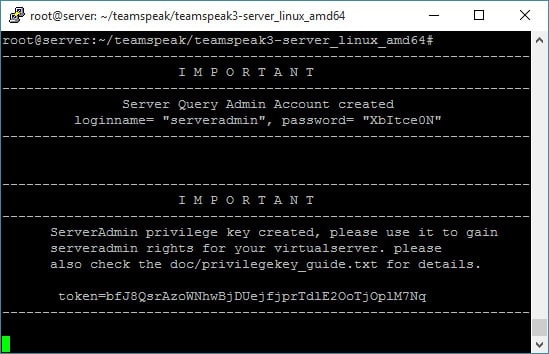
./ts3server_startscript.sh startCopy the login name, password, and token that are printed the first time the server is started. You’ll need them when you connect the first time:

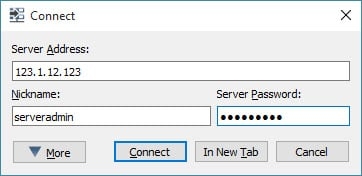
Open TeamSpeak client on your computer. Open the connect dialog (CTRL + S) enter the IP address of your server, the nickname serveradmin the password:

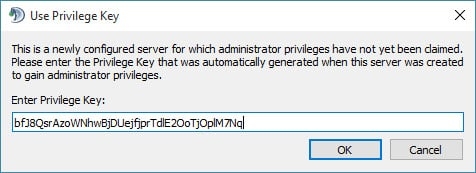
Once the connection is successful the client will ask you for the security token. Copy it from the SSH session and paste it into the dialog box in the client.

Making TeamSpeak Start Automatically
You can make TeamSpeak automatically start every time your server reboots just like this:
While in TeamSPeak's directory teamspeak3-server_linux_amd64 create a new file:
nano /etc/init/teamspeak.confPaste this code and save:
#!/bin/shThe next time your server reboots TeamSpeak will start automatically.
chdir /root/teamspeak/teamspeak3-server_linux_amd64/
respawn
setuid root
setgid root
exec /root/teamspeak/teamspeak3-server_linux_amd64/ts3server_minimal_runscript.sh
start on runlevel [2]
stop on runlevel [013456]
Configuring Firewall
If you use a firewall the following ports will need to be opened: 9987, 30033, 10011, and 41144. Here’s the commands to open those ports in IPtables. Run each line as a separate command.
iptables -A INPUT -p udp --dport 9987 -j ACCEPT
iptables -A INPUT -p tcp --dport 30033 -j ACCEPT
iptables -A INPUT -p tcp --dport 10011 -j ACCEPT
iptables -A INPUT -p tcp --dport 41144 -j ACCEPT
Conclusions
That's it, TeamSpeak is installed, configured to start automatically after server's reboot and ready to be used.


