frame
Howdy, Stranger!
It looks like you're new here. If you want to get involved, click one of these buttons!
Sign In RegisterHowdy, Stranger!
It looks like you're new here. If you want to get involved, click one of these buttons!
Quick Links
Categories
- 1.4K All Categories
- 7.3K General
- 6.2K General Discussions
- 412 Feature Request/Bug Report
- 545 Sales Questions and Answers
- 54 Time4VPS Life
- 242 Help requests
- 244 Server management
- 390 Tutorials
- 68 Various Tutorials
- 71 Web hosting control panels
- 133 Performance and Security
- 29 Web Applications
- 64 Linux Applications
- 25 Windows VPS
[Ubuntu/Debian] Rewrite URLs on Apache Server
 Lawrence
Member

Introduction
In this tutorial you will learn how to activate and manage URL rewrites using mod_rewrite module. Simply, mod_rewrite is used for rewriting a URL at the server level, giving the user output for that final page.
mod_rewrite provides a way to modify incoming URL requests, dynamically, based on regular expression rules. This allows you to map arbitrary URLs onto your internal URL structure in any way you like.
It supports an unlimited number of rules and an unlimited number of attached rule conditions for each rule to provide a really flexible and powerful URL manipulation mechanism. The URL manipulations can depend on various tests: server variables, environment variables, HTTP headers, time stamps, external database lookups, and various other external programs or handlers, can be used to achieve granular URL matching.
Requirements
Only requirements are to have user with sudo privileges (root is fine) and Apache installed on your VPS.
Tutorial on how to create new user and grant him sudo privileges can be found here.
Tutorial on how to install LAMP stack (Apache, MySQL, PHP) can be found here.
In this tutorial we will be using Ubuntu 16.04, however you should be able to use all our offered Ubuntu and Debian versions.
In Time4VPS you are able to install Ubuntu 16.04 template really easy and fast, only with few mouse clicks:
- Login to the Client Area;
- Select at the top of menu the "My Services > VPS" tab;
- Press the "Manage" button at the service table;
- Press the "Install OS" button;
- Choose Ubuntu 16.04 operating system, agree with warning and press "Continue";
- Wait for 5-10 minutes and refresh VPS management page.
Updating System
First things first. Like always, first of all, we recommend to update and upgrade your server.
apt-get update
apt-get upgrade -y
Enabling mod_rewrite
First, we need to activate mod_rewrite (if it's not already activated):
a2enmod rewrite
This will activate the module or alert you that the module is already enabled. To put these changes into effect, restart Apache.
service apache2 restart
mod_rewrite is now fully enabled.
Setting Up .htaccess
An .htaccess file allows us to modify our rewrite rules without accessing server configuration files. For this reason, .htaccess is critical to your web application's security.
nano /etc/apache2/sites-available/000-default.conf
Note: If nano is not installed install it with:Inside that file, you will find a <VirtualHost *:80> block starting on the first line. Inside of that block, add the following:apt-get install nano
<Directory /var/www/html>To put these changes into effect, restart Apache.
Options Indexes FollowSymLinks MultiViews
AllowOverride All
Require all granted
</Directory>
service apache2 restartNow, create the .htaccess file in the web root (if you had installed WordPress, Joomla and so on, it's already created):
nano /var/www/html/.htaccessAdd this line at the top of the file to activate the rewrite engine.
RewriteEngine onNow you are able to start using URLs rewriting, which you will learn in next step.
Configuring URL Rewrites
That it would be easier to learn we will do it with an example. It is, we will make file accessible via http://IP_of_your_server/example.html to be accessible via http://IP_of_your_server/example as well.
Begin by creating a file named example.html in the web root.
nano /var/www/html/example.htmlCopy the following HTML code into the file, then save and close it.
<html>You can access this page at http://IP_of_your_server/example.html, but notice that if you try to access http://IP_of_your_server/example, you will see a 404 Not Found error. If you would users to access the page using simply /example instead, rewrite rules will allow this very functionality.
<head>
<title>Example</title>
</head>
<body>
<h1>Example</h1>
</body>
</html>
All RewriteRules abide by the following format:
RewriteRule pattern substitution [flags]
- RewriteRule specifies the directive.
- pattern is a regular expression that matches the desired string from the URL, which is what the viewer types in the browser.
- substitution is the path to the actual URL, i.e. the path of the file Apache servers.
- flags are optional parameters that can modify how the rule works.
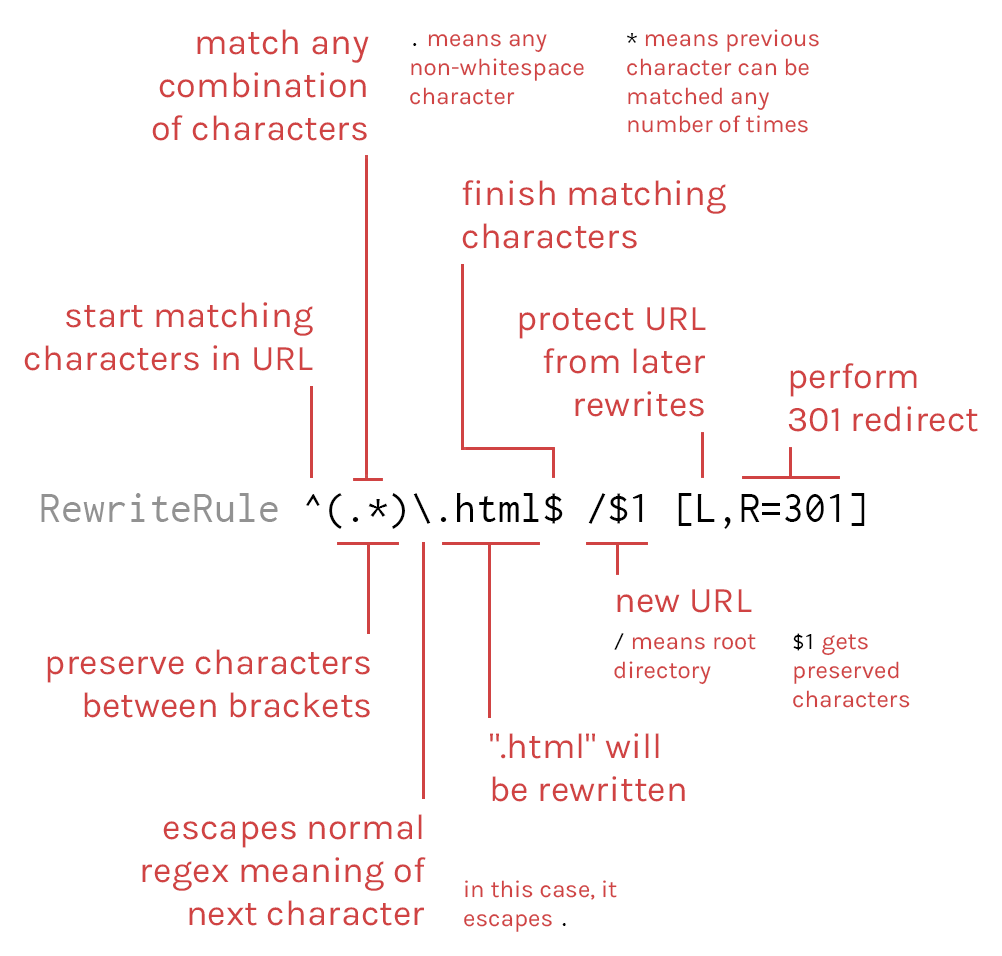
nano /var/www/html/.htaccessAfter the first line, add the RewriteRule. It should look like this:
RewriteEngine OnThere is explanation of this rule:
RewriteCond %{REQUEST_FILENAME} !-f
RewriteCond %{REQUEST_FILENAME} !-d
RewriteRule ^(.*)\.html$ /$1 [L,R=301]

Now, you should be now able access http://IP_of_your_server/example in your browser.
Conclusion
mod_rewrite is a useful Apache module that can be used effectively to ensure human-readable URLs.
If you'd like to learn more about mod_rewrite, take a look at Apache's mod_rewrite Introduction and Apache's official documentation for mod_rewrite.


